Make sure to visit my new page at : www.fashionvictimwithitchyfeet.com
Moving!
23 Wednesday May 2018
Posted in Uncategorized

23 Wednesday May 2018
Posted in Uncategorized
Make sure to visit my new page at : www.fashionvictimwithitchyfeet.com
24 Monday Apr 2017
Posted in Home, Organization, Uncategorized
Tags
bathroom, curtain, decor, decorating, decoration, DIY, Home, home decor, kitchen, window covering
Moving can be quite expensive. Not only you have the mortgage, the moving company, the fees to transfer your internet and electricity accounts (and more) but there is almost no way your current window covering will fit 1 – your new color scheme 2- your window size.
As a matter of fact, the only thing I could use from my previous apartment was a curtain rod. Not even the hardware. The former owner let blinds and curtains but there was NO WAY I could think of using these curtains. (please refer to my older post about how gross the house was…)
I finally agreed on using the kitchen blind, aside from being super dirty, the mechanism was fine and the ivory/yellowish color suited my color scheme. Before moving in, I brought this blind with me, unrolled the complete thing on my living room floor, sprayed it liberally with degreaser, brushed it with a dish brush and rinse it all in the shower; repeat a second time. In the end, it was ok. We replaced the orange vertical blinds in the bathroom with white ones because the orange didn’t fit the light blue/sea side scheme we wanted. For those two windows, I had an issue, we saw the blind mechanism.
So we went to Fabricville and purchase fabric to hide the mechanism. I kept the curtain rods the former owner had, they applied Velcro on it, so I thought I would sew the other moiety of Velcro on my fabric to attach my new and clean curtain.
I purchased thick cotton with motif and white cotton for the lining. I have the chance to have access to a sewing machine at my parents place, but if it’s not your case, you can use the “tape” we find in craft/fabric stores. It’s a ribbon you place between to pieces of fabric and you melt it with an iron. Easy and speedy to use!


19 Wednesday Apr 2017
Posted in Home, Organization, Uncategorized
Tags
decor, decorating, decoration, home decor, homekeeping, house, housekeeping, moving, Organization, projects, storage
Because there is nothing like moving in and before being able to empty the last box, fly on the other side of the continent for a conference. Yep, that was the plan when we moved few weeks ago. We were moving on Friday and on Sunday morning I had a plane to catch to take me to San Francisco for a whole week conference… Awesome. So I left on the Sunday morning, leaving behind me a huge mess and I came back to a cataclysm… delightful.
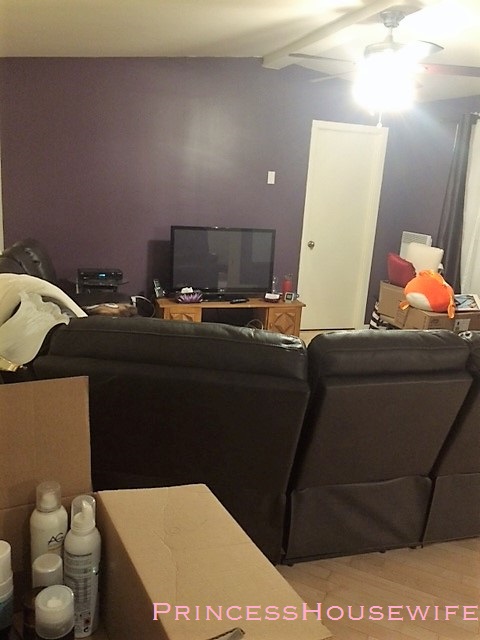
Nevertheless, I have been able to put myself together and at least clean the countertop! As you will see in the following pictures, there a still work to do, but it is still livable. The next big project regarding this home will be to purchase the wall unit for the TV, we already know what we want, we just need to dedicate some time to do it.
So far here is how it looks:
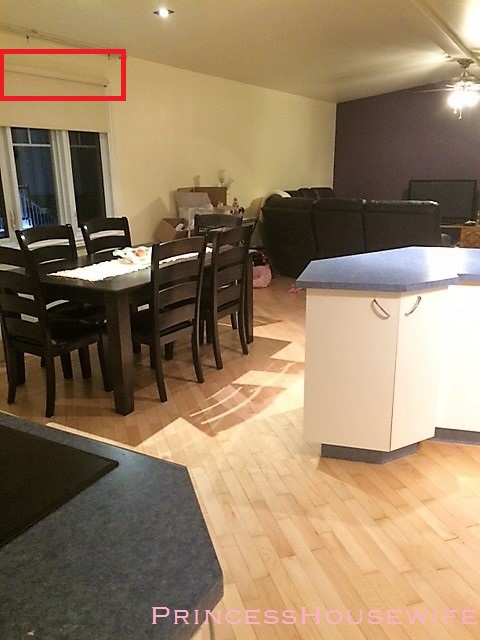
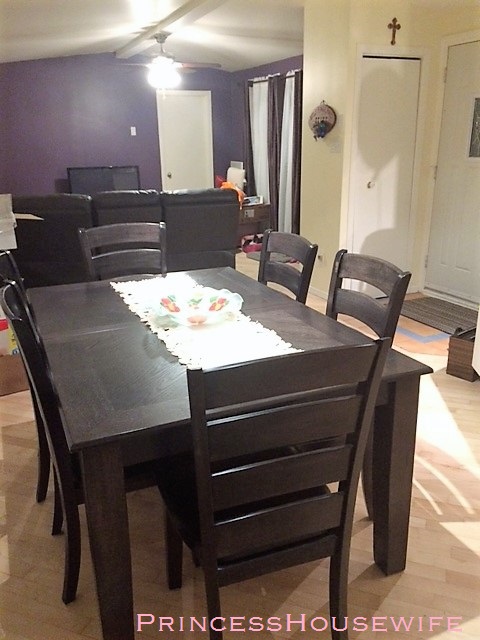
Here is the living room, this is the messier room of the house (except for the office, see this closed door? well, that’s all you will see from the office so far) You can see a few boxes here and there waiting to be either unpacked or throw away. I am really satisfied how the deep purple turned out!
Moving to the kitchen
I still want to sew a short curtain to hide the blind mechanism, I kept the old curtain rod which has Velcro on it, we purchased the fabric last weekend. If I have any luck, I will be able to complete this project over the weekend.

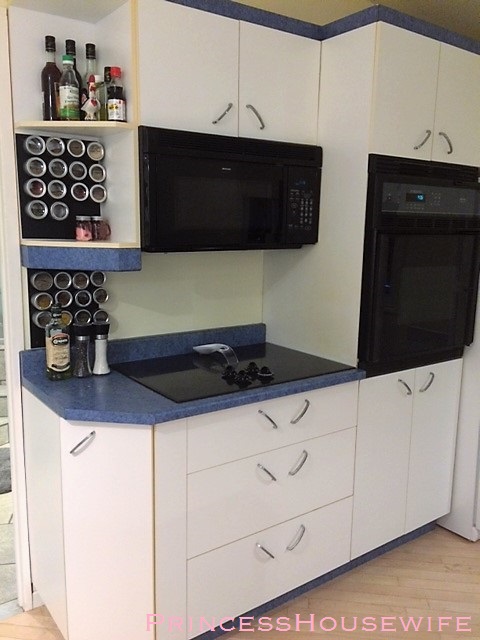
Here is something I am SUPER proud of, the silver tins on the wall next to the range top are magnetic tins for spices. All my spices are stored in these small jars, identified with a p-touch and alphabetically organized. I asked my father to find me some piece of metal on which my magnets would stick, at first I wanted stainless steel, but it was brought to my attention that it wasn’t magnetic. My father brought this cold roll piece he painted black and it’s just perfect! 😀
Which brings us to the bathroom


I am really happy of how the bathroom turned out, but just because I think it is important to remember the mistake of the past so we can learn from those, here is what the bathroom looked like when we got the house:


Unfortunately I don’t have better pictures for this bathroom (although I am not sure it was possible to take “good pictures” of this) I think the light blue we chose renders way better than this dark orange, moreover when you consider that everything in this bathroom is grey/blue…
And finally the bedroom, I think this is my masterpiece… 

Disclaimer: My boyfriend was OK with the paint, in fact he was really thrilled of this combination (dark gray and light pink) and he chose this duvet cover from a few I submitted. I won’t lie, I love Pink, but this room is not reflecting only MY choices.
Few organization projects I want to tackle next will be our pantry and the teas… I need to figure out a way to organize those David’s tea tins…
29 Wednesday Mar 2017
Posted in Cleaning, Home, Uncategorized
Tags
clean, Cleaning, decorating, decoration, DIY, homekeeping, housekeeping, owner, paint
Finally, after 1 week and half of scrubbing, washing, painting, repairing and changing fixtures, blinds and more, the dump we purchased looks like some place I could live in! We had to paint every single squared inch of the house: ceillings, walls, baseboard… But it worth it!
Luckily, my father and his girlfriend helped out a lot, now the only thing we have left to do is to deep clean the kitchen cabinets and windows prior we move our furniture in!
During the past week, we also had the floors sanded and varnished. This was a major change in the overall look of the kitchen, living room and master bedroom. The pictures below are after the paint project in these 3 main areas. The left side of each picture is before sanding and the right side is after sanding. I can’t believe how yellow the floor turned over the years!
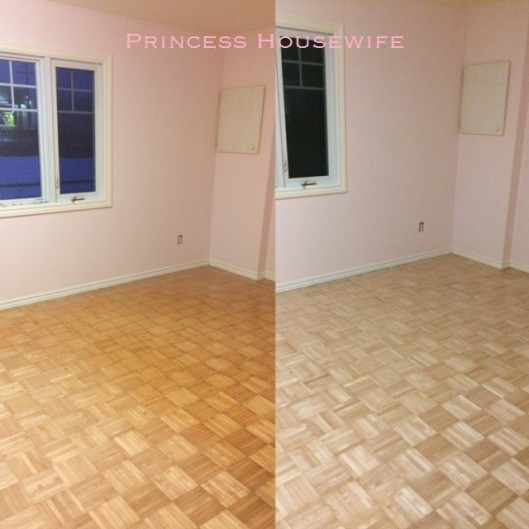

In the beginning, I wasn’t sure I wanted to spend on this, I thought the floor looked just fine, but seeing the “after” makes me grateful we did hired someone to do it!
21 Tuesday Mar 2017
Posted in Cleaning, Home, Organization, Uncategorized
Tags
clean, Cleaning, decoration, degreaser, dirt, grease, gross, homekeeping, house, housekeeping, paint, painting, smoke, surprise
After the major snow storm, we finally received the keys to our new house, yeah!!! On Thursday night, we went for the first time as the official owners… wow… but not wow like positive and bright, more wow like, wow, I can’t believe people would live in such a dirty, gross and filthy place. I have never seen something like that. All the walls were coated with a mix of cigarette smoke and grease. Every. Single. Wall. And. Ceiling. The first thing we did was to toss out the curtains and open the windows. We spent the entire nights on Thursday and Friday just to wash off the grease so the paint would stick on the walls. We used degreaser and the product was dripping yellow on the walls. Every time we would open a door, remove a rod or removing an electrical plate, we would find more dirt and grease. The last picture is a kitchen cabinet I sprayed with degreaser, can you see the grease dripping down?


After spending two nights scrubbing, wiping, cleaning, we were ready to paint. We spent the week end on that. We are not done yet, but more than halfway through. Pictures to come!
14 Tuesday Mar 2017
Posted in Cleaning, Home, Uncategorized
Tags
clean, Cleaning, detergent, DIY, homekeeping, housekeeping, laundry, soap
Since I have been doing my laundry like a grow-up adult (read here: since I was 22 years old) I have been using liquid commercial detergent and lately the newest “pods” you just drop in your washing machine. Super convenient, easy perfect for lazy people like me. Obviously, I also integrate the fabric softener to my routine!
It has been brought to me that the commercial fabric softener tends to “clog” on the clothes, namely on the towels and they lose their “fluffiness” when you wash them. Also, the well know surfactants tend to stick on the fabric and clothing, therefore, although your clothes look clean, they are full of surfactants and other, meaning that if you purchase a fabric for a specific property (performance, fire resistance…) it might lose this property over time.
In my quest for a greener house, I found an homemade laundry recipe which will work fine for any type of washing machine (HE included) if you follow this easy constraint:
Your soap NEEDS to be “natural” sourced, without or very low sodium lauryl ether sulfate (SLES)
When you have an HE washing machine, you need to have a soap/detergent that will produce very little foam, therefore you want something with minimal foaming agent. This is why I used the Dr. Bronner’s castille soap bar (I chose the unscented one) it only contains different saponified oils and glycerin. There are alternate recipes for liquid detergent, however, I wouldn’t recommend DIY liquid detergent as I haven’t found a recipe with an effective preservative. The liquid detergent will tend to develop bacteria and mildew, this is why I decided to go for the traditional version.
you will need:
Mix all of those in a air tight container and use between 1-3 Table Spoon per load.
This soap might be hard to dissolve if you wash with cold water, I would recommend you pre-dissolve your quantity in a cup of warm water if it’s your case. Since I wash with warm water, I am not overly concerned with this issue, but I just wanted to point it out.
To be honest, the hardest part is to grate the soap!
23 Thursday Feb 2017
Posted in Cleaning, Home, Uncategorized
Tags
baking soda, clean, Cleaning, green, homekeeping, housekeeping, organical, organically, oven, vinegar
One of the thing that I hate cleaning is the oven (although my boyfriend just told me we can actually REMOVE the door) everything is stuck so hard, the element is always in your way, the door prevents you to easily access the bottom of the oven (I can’t wait to try with the door removed)
A few months ago, we had an “event” in the oven, my boyfriend baked a pudding chômeur; with the heat, the dough rose and the maple syrup boiled. And what happen when you don’t use a baking plate large enough? That’s it, spills all over the place. What is nice with the maple syrup, taste aside, is that since it’s mainly sugar, with the heat it caramelizes and bakes on hot surfaces. At that time, I cleaned it the best I could, but the bottom of my oven is ruined. Since then, we have been using disposable cookies sheets under the element to catch up any spills.
In the new house we purchased, there is a built-in oven, we won’t need my Maytag anymore, but my boyfriend’s youngest daughter is moving in and needs a stove. I was happy to offer mine for free. However, I can’t give her a gross and dirty appliance. So last night, I started cleaning this. I thought I had some Easy-Off left, there was still product in the can, but no more gas to bring it out. No worries, here is a good start for my “green commitment”. Moreover, using Easy-Off in my oven always freaks me out, I mean, I cook food in there! Rinsing the oven takes more time than cleaning in my case.
According to Becky Rapinchuk from clean mama and her book Organically Clean Home, I was fairly convinced I could find some miracle recipe.
Using :


This is not nuclear physic, I haven’t measured anything. Mix to get a paste and then spread with a sponge or a cloth.
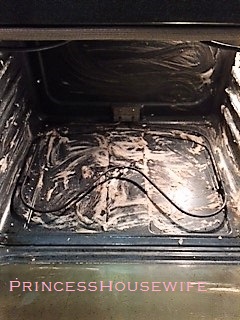
I waited about 15 minutes, than, with a spayed bottle, I liberally sprayed vinegar everywhere to increase the cleaning power. Waited another 15 minutes and just wiped everything.
My oven is now as clean as it is possible to be, so I won’t be the gross step-mother when handing this appliance.
21 Tuesday Feb 2017
Posted in Cleaning, Home, Uncategorized
Tags
baking soda, borax, clean, Cleaning, DIY, green, jars, natural, Organization, Recipe, washing soda
This is probably one of the most counter intuitive post ever. I have a degree in chemistry, therefore, chemical products have always (at least since university) been part of my life. I know that everything on Earth can be described as “chemical” and it’s the dosage that makes the poison (Paracelse).
However, I have always been fearful of using toxic cleaning products in let’s say microwave or oven. (please notice the difference here between toxic and chemical) As time goes by, I realize that surfactants contained in laundry soap might damage certain clothing, that the bathroom cleanser I use which makes me cough like crazy might do more harm than I thought…
So despite my chemistry degree, I have decided to go green as much as possible, however, I do not want to sacrifice efficiency. The homemade cleansers use for the most part, baking soda, washing soda, vinegar and borax. Essential oils can be added, but it’s optional.
Baking soda, Vinegar and Borax can be easily found in Canada. I purchased Borax at Canadian Tire. However, Washing Soda is not available, or at least, I haven’t found it, however, based on a simple chemical reaction, we can convert baking soda into washing soda.
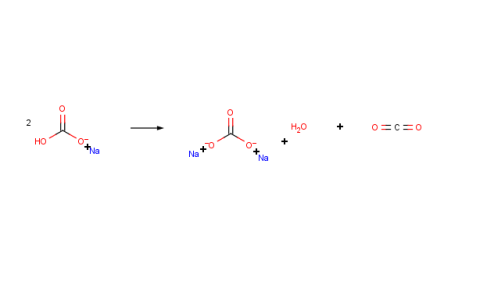
The heat will allow us to convert NaHCO3 (baking) into Na2CO3 (washing). Pour baking soda into a baking sheet, I used a pyrex and place into your over, set at 400F. I left the powder over there for about 1 hour stirring 3 times during the “cooking time” I didn’t find that the difference between baking and washing soda was super noticeable, but the washing soda is much more basic, therefore, you can feel the difference.
Careful when touching the powder or inhaling the dust as the pH is very high. If you touch the powder and then rinse your fingers, you will feel a soapy texture between your fingers, the pH is so high, it will react with your skin oil to make soap.
This washing soda will be used for my laundry soap recipe. I give you news!
Recipe for washing soda:
4 cups of baking soda
18 Saturday Feb 2017
Posted in Recipe, Uncategorized
So, last weekend, we had guests over for a fondue. However, having a super busy day (hot water tank shopping and wedding cake tasting) I didn’t have time to prepare a fancy cake prior dinner and I didn’t want to go for the classic chocolate fondue, since we had this last time they came.
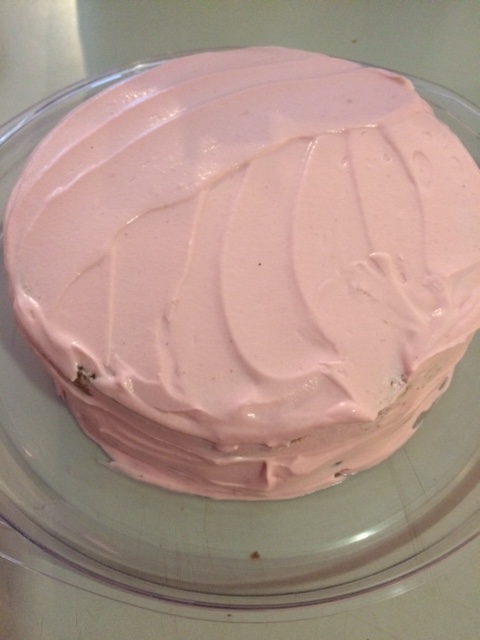
I had the idea of a lemon cake with raspberry icing, however, I had never baked a lemon cake, since I am not particularly ecstatic over lemon desserts. A few weeks ago, while we first met our potential baker for the wedding, we got to taste a lemon cupcake with raspberry frosting, what a surprise! The delicate taste of lemon mixed with the sweetness of the raspberry was such a revelation! Plus, the baby pink color brought by the raspberries is not to discourage me…
So, I came up with a recipe from Let Them Eat however, I was not super confident about the Italian meringue for the icing, I didn’t have much time to prepare the cake. So I came up with a light icing version.
For the Cake:
For the icing
For the cake
Lightly coat two 9-inch round cake pans with baking spray. Line bottoms with parchment paper and coat once again with baking spray. Adjust oven rack to middle position and preheat oven to 350°F.
In food processor, pulse lemon zest and 1 1/2 cups sugar until no zest strands remain. (See Notes).
Whisk flour, baking powder, baking soda, salt, and lemon sugar together in large bowl. In separate medium bowl, whisk together melted butter, milk, lemon juice, oil, egg yolks, and vanilla.
In bowl of standing mixer or large bowl, whip egg whites with whisk attachment on medium speed until soft peaks form, about 2 minutes. Gradually add remaining 1/4 cup sugar and continue whipping until stiff peaks form, 1 to 2 minutes longer. If you used the stand mixer bowl, transfer whites to separate bowl.
Place flour mixture in now empty stand mixer bowl. With whisk attachment and mixer at low speed, gradually pour in liquid mixture and mix until ingredients are almost fully combined, 15 to 30 seconds. Scrape sides and bottom of bowl with rubber spatula. Increase speed to medium and mix until smooth, about 20 seconds. Fold in egg whites and divide batter equally between prepared pans.
Bake until tester inserted in center of cakes comes out clean, 20 to 25 minutes. Transfer cakes to cooling racks and cool 10 minutes in pans.
For the Icing
Heat the raspberries with the sugar until you get a liquid jam texture.
Pour over a sieve to retain only the liquid, let cool.
Whip the heavy cream until firm pic and carefully integrate to yogourt.
Add the homemade jam. If the raspberries bitterness is still present, you can add more sugar.
26 Thursday Jan 2017
Posted in Organization, travel, Uncategorized
My boyfriend and I are lucky enough to reward ourselves with another trip down south. I love going down south, specifically when the winter is harsh. Ok… This year the winter hasn’t been so harsh, however, I can’t remember last time we saw the sun…
I love getting prepared for the trip, usually I think of my outfits long in advance and I prepare a list and I purchase a new bikini… This year has been a bit different…
This is our 6th trip together, so I am fairly aware of what is waiting for me, also, I have been traveling a few time for business purpose, the airports, plane and travel in general are not scary for me anymore.
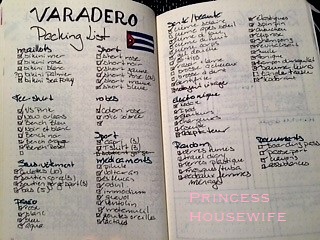
These past few weeks have been pretty hectic, with Christmas, preparing the move, the wedding preparation… I haven’t prepared a list for packing, I just decided to use the list I used for my previous vacations.
I do not define myself as an overpacker, I don’t pack any make up when we are going on vacation, but I need to assume that I am pretty high maintenance. We always use our beloved luggage set we purchased at Sears in the US back in 2014. We wanted something bright that you can easily recognize on the carousel, the downside is that I am being judged when I use this set on business trip, but who cares! I would have prefer a pink one, but white and purple were the only colors available at that time.

I first start with the important things, which means in this case, bikinis and swimsuit cover-ups. I am not super fancy for my cover-ups, I use pareos (sarong) and surf shorts, I just dump everything I might need on my bed and then make sure I have enough for the week when I fold the clothes.


I like to pack my swimsuit in ziploc bags, this way, even if they are still damp when we fly back, they don’t ruin my other clothes.
Right after the bikinis, come the clothes, I usually pack three pairs of jeans (real shorts) shorts and a flowy skirt along with cheap, light and bright T-shirts and tank tops. I also always have this wishful thinking that I will have a few training during my stay (LOOOOLLL) on my first trip, I brought like 4 or 5 training kits (LOLLL) I ended up with a strained calf muscle on the second day after a run in the sand, I was not able to run anymore, I could barely walk! On the next trip, I brought 3 or 4 kits, thinking that I would train at the gym (LOOOOOLLLLL) here in North America, the gyms are chilly if not cold, down there, the gyms are barely, and sometime not even, air conditioned. This time, I bring only two, and I hope I will be motivated enough to train at least once.


Since I take the larger suitcase, I pack with me all the toiletries and other necessities. When I decluttered the cupboards above the washing machine, I took the opportunity to cluster all our travel accessories in a single bin. So now, whenever we are going on a spontaneous getaway or a more planned trip, the toiletries are easily accessible and almost already packed. The pink metallic bag is a bag I bought at Victoria’s secret and it always contains the essential toiletries (shower gel, toothpaste, shampoo…) I only have to pick it up and place it in the suitcase.
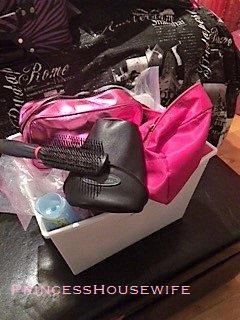
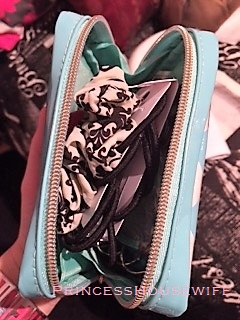
I always pack the small items in separate bags (such as the pink metallic one) the large pink one is for medicine, when we go down south I tend to be paranoiac, I am afraid we won’t be able to find advil, lactaid (I am lactose intolerant), gravol… So I bring a complete medicine cabinet with me. Similar items are packed together and so on, so I have a separate bag for my face cleanser, micellar water, cream and so on, a bag for my hair accessories, I tend to bring a lot of elastic to compensate for the one I will lose and the one that will break while I am doing my ponytail.
And finally, here is the final result! I always pack the toiletries at the bottom of the suitcase, this way, if one of the bottle explodes, the leak won’t be covering the entire suitcase. I also finish my packing with covering the top with either a towel, or in this case our beach bag to secure all the clothing and bags in place.


Also, when traveling down south, don’t forget to bring gifts for the maids, I took my decluttering quest to my advantage, I will bring purses, shoes and make up.
